Tuesday, May 28, 2013

SPQ13 Hans


This week in class we cut open a few oil filters to see what they looked like inside. So I decided that I was gonna take apart a few of my own. I had two old oil filters from my car laying around so I cut them open. One filter was a fram filter and the other was a napa filter. I was very interesting to see the differences of what the filters look like inside of them and how they are made. I think that for my next oil change I am going to get a filter from Honda so I can cut it open to compare what it looks like next to one of the other filters.

This is the napa filter. It has metal end caps and is a non bypass filter. I didn't find anything wrong with the filter media and no shiny metal pieces so that's good

This is the fram filter. It has a gasket material for the end caps and is a bypass filter. It uses a metal clip, instead of glue, to hold the filter media together. It is slightly longer than the napa filter.

The bottom of the napa filter on the left and the fram on the right. I am not sure that I like how the fram filter is a bypass filter.

This week = 30,  total = 284

Monday, May 20, 2013

SPQ13 Hans


This is something that I have learned that you can use old washing machines/dryers for other than just taking them to the scrap yard. The metal on them is actually really good to use for replacement body panels. In this case I used a washing machine lid to make an interior floor panel that goes next to the dog house on an international dump truck


This is the finished product pop rivited into place. I coated the bottom with high temp paint because it sits right above the exhaust. On the top I used a bed liner spay that comes in a rattle can. The bed liner coating turned out very well and I figured that it would hold up better than paint.

Monday, May 13, 2013

SPQ13 Hans

This week I learned how to set the pressure relief on the Peterbilt. This was actually a very simple thing to do. The pressure relief valve has a set screw on it that you turn in or out to adjust the pressure up or down. Then you just turn the set screw and watch the pressure gauge until you get the desired pressure that you want, in this case it was 2000 psi. Then you tighten down the jam nut on the set screw so it can't move around any and you are done.

This week = 45,  total = 216

Tuesday, May 7, 2013

SPQ13 Hans

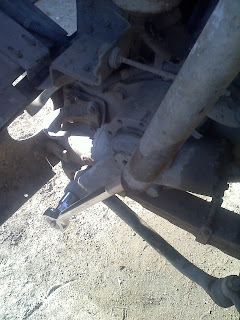
This week I replace the drag link on a 1987 International s2300. This truck probably hasnt had alot of parts replaced on it in its life time because it only has about 150k on it. I was performing an LOF on the truck and checking everything out. After pulling up and down on the drag link I noticed that it had some slop in it and I didn't like how it felt so I decided it was getting replaced

The end connected to the steering arm was the end with the slop in it

Using a little persuasion to get the nuts off. 3/4" ratchet and a cheater bar

Then I had to get the drag link off of the steering arm. This took a little work and it probably would have been easier if I had a hammer a little bigger than a 40 oz ball peen. After I got this end off I had found that the reason for failure was that this end hadn't been greased in a while. The end connected to the pitman arm was still good because it had been getting greased. I would say that this is where the saying grease is cheap, parts arent comes into play.

New drag link installed and cotter pins in place